
If you build WordPress themes, plugins or client sites, Cursor already knows your code. What it does not know is your live site: the pages, settings, Elementor layouts and products. You end up switching between the editor and wp-admin to check things the agent cannot see.
Connecting Cursor to WordPress with MCP closes that gap. The Cursor agent can read and change site content while you code, using the same chat. This guide covers the full setup, config options, safe token handling, useful prompts and fixes for common errors.
Quick answer: Install HandyMCP on your WordPress site, create a personal access token under HandyMCP > Connection, and add the server to ~/.cursor/mcp.json with your site URL and a Bearer token header. Restart Cursor and check the server shows as connected in its MCP settings. The whole setup takes about five minutes.
What a Cursor WordPress MCP connection gives you
MCP (Model Context Protocol) is an open standard that lets AI apps call outside tools. HandyMCP is a WordPress plugin that turns your site into an MCP server. Cursor connects to that server and gets tools such as list posts, update page, read Elementor layout or edit product.
HandyMCP runs on your own site. There is no relay, no vendor account and no usage fee or limits. Cursor talks to your site directly.
New to MCP? Read what MCP is and how it works with WordPress first.
Why developers connect Cursor to WordPress
- Code and content in one place. Write a block or shortcode, then ask the agent to add it to a draft page and check it.
- Real data while debugging. The agent can read the actual page content, settings or product data instead of guessing.
- Faster content tasks. Turn a CHANGELOG.md into a draft post, or update docs pages from your README.
- Builder inspection. Read an Elementor layout and see which widgets and settings a page uses.
What you need
- WordPress 6.2 or newer, PHP 7.4 or newer, and HTTPS.
- An administrator account on the site.
- Cursor installed on your computer.
- The free HandyMCP plugin. See install steps.
Use a staging site first if you have one. It is the easiest way to learn how the agent behaves.
Step by step: connect Cursor to WordPress
Cursor’s menu names can change between versions. If a label looks different, look for the MCP section in Cursor’s settings.
Step 1: Install HandyMCP
In wp-admin go to Plugins > Add New, upload or search for HandyMCP, then activate it. The HandyMCP menu adds Connection, Abilities, Activity, Undo history and Settings.
Step 2: Copy your server URL
Open HandyMCP > Connection. Your server URL looks like this:
https://your-site.com/wp-json/handymcp/v1/mcp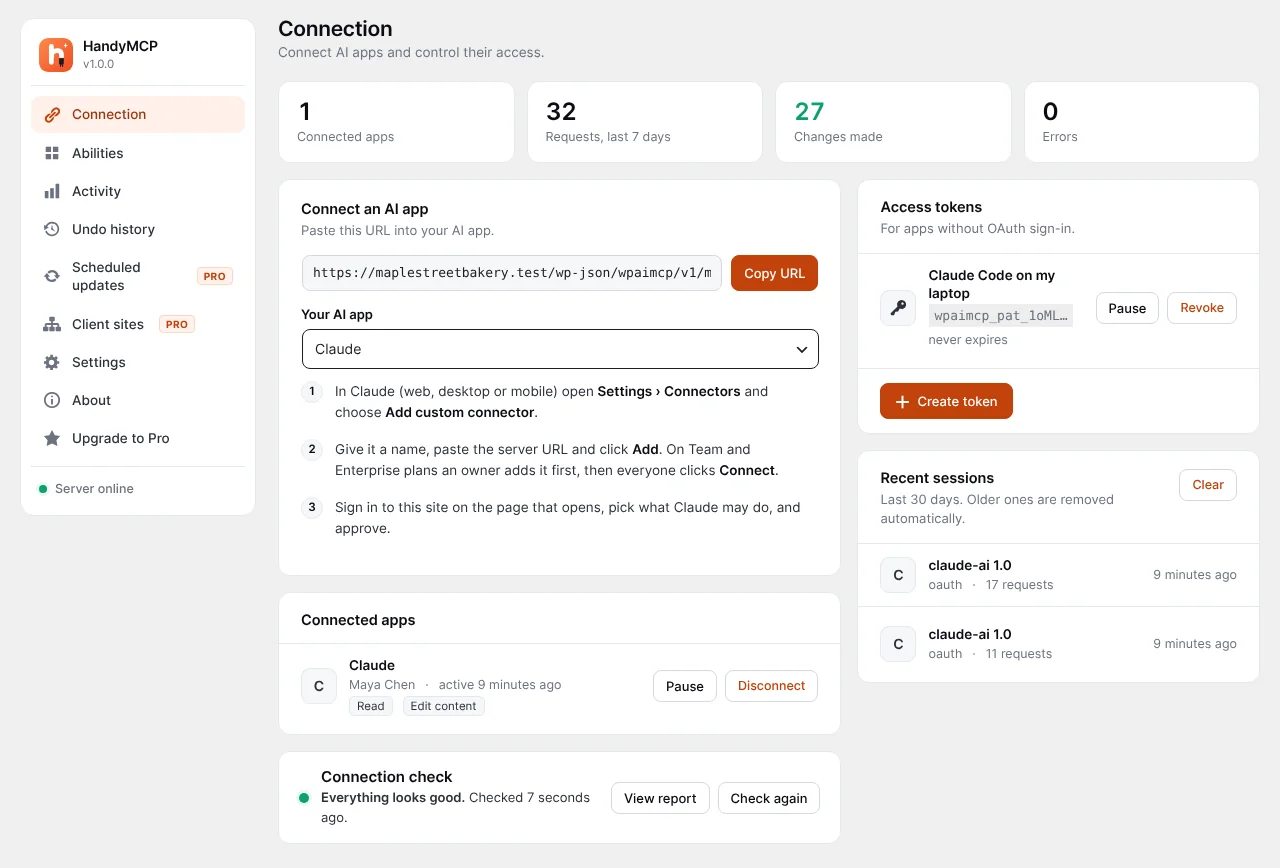
Step 3: Create a personal access token
- On the Connection screen, open Access tokens.
- Create a token and give it a clear name, such as “Cursor on work laptop”.
- Choose its permissions. Start narrow.
- Copy the token right away. It is shown once and stored hashed, so you cannot view it again later.
Step 4: Add the server to mcp.json
Cursor reads MCP servers from a JSON file. You have two choices:
| File | Scope | Best for |
|---|---|---|
~/.cursor/mcp.json |
Every project on your machine | Your own sites, one token per machine |
.cursor/mcp.json in a project |
That project only | A client project tied to one site |
Add this, with your URL and token:
{
  "mcpServers": {
    "wordpress": {
      "url": "https://your-site.com/wp-json/handymcp/v1/mcp",
      "headers": { "Authorization": "Bearer YOUR_TOKEN" }
    }
  }
}
To connect more than one site, add more entries with different names:
{
  "mcpServers": {
    "shop-staging": {
      "url": "https://staging.your-shop.com/wp-json/handymcp/v1/mcp",
      "headers": { "Authorization": "Bearer STAGING_TOKEN" }
    },
    "shop-live": {
      "url": "https://your-shop.com/wp-json/handymcp/v1/mcp",
      "headers": { "Authorization": "Bearer LIVE_TOKEN" }
    }
  }
}
Step 5: Restart and check
Save the file and restart Cursor. Open the MCP section in Cursor’s settings and check that the server shows as connected with a list of tools. You can also run the connection check on HandyMCP’s Connection screen.
Prompts to try in Cursor
Start with read only tasks:
- “List the active plugins and theme on my WordPress site.”
- “Read the Elementor layout of the home page and tell me which widgets it uses.”
- “Show me the ten most recent posts with their categories.”
Then mix code and content:
- “Create a draft page called Changelog using the notes in CHANGELOG.md. Do not publish it.”
- “Compare the product fields I use in this template with the real data on product ID 42.”
- “On the draft Pricing page, change the second heading to Plans for teams.”
- “Purge the site cache after that change.”
More examples are on the prompts page.
Free vs Pro for developers
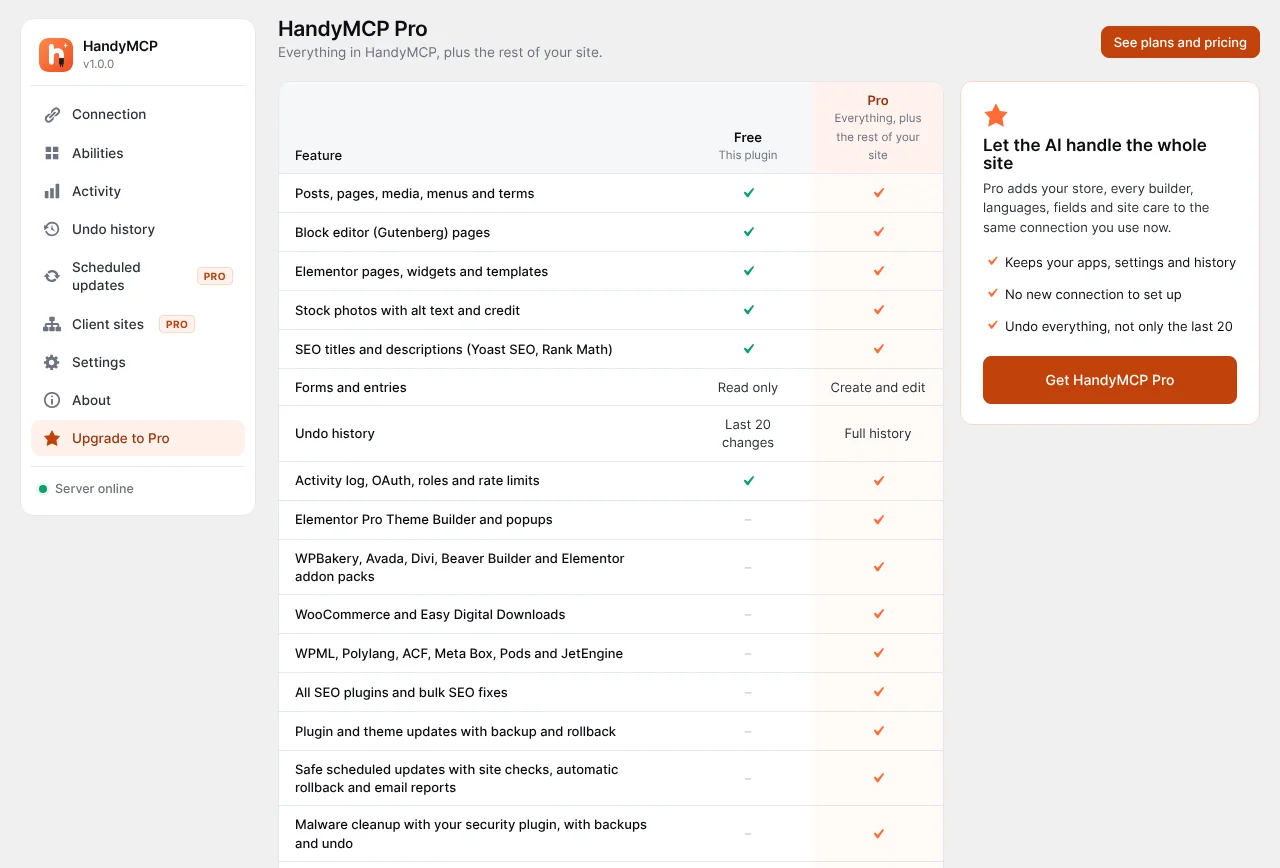
The free plugin gives you posts, pages, menus, media, Gutenberg blocks, Elementor editing, SEO fields, categories and tags, WooCommerce basics, form editing, Activity log, undo for the last 20 changes, site info and cache purge.
Pro adds tools developers often want:
- File editing with a PHP syntax check, backup, live test and automatic revert if the site breaks.
- Plugin and theme installs and updates with a requirement check, zip backup, one by one updates, a home and login page health check and automatic restore on error.
- Search and replace, redirects, SEO audits, custom fields (ACF, Meta Box, Pods, JetEngine) and other builders.
- Full undo history.
See pricing for plans.
Keeping your token and site safe
Never commit tokens
A project level .cursor/mcp.json with a real token should never go into Git. Add it to .gitignore, or keep tokens in the global file only. If a token leaks, revoke it on the Connection screen straight away.
Limit what the agent can do
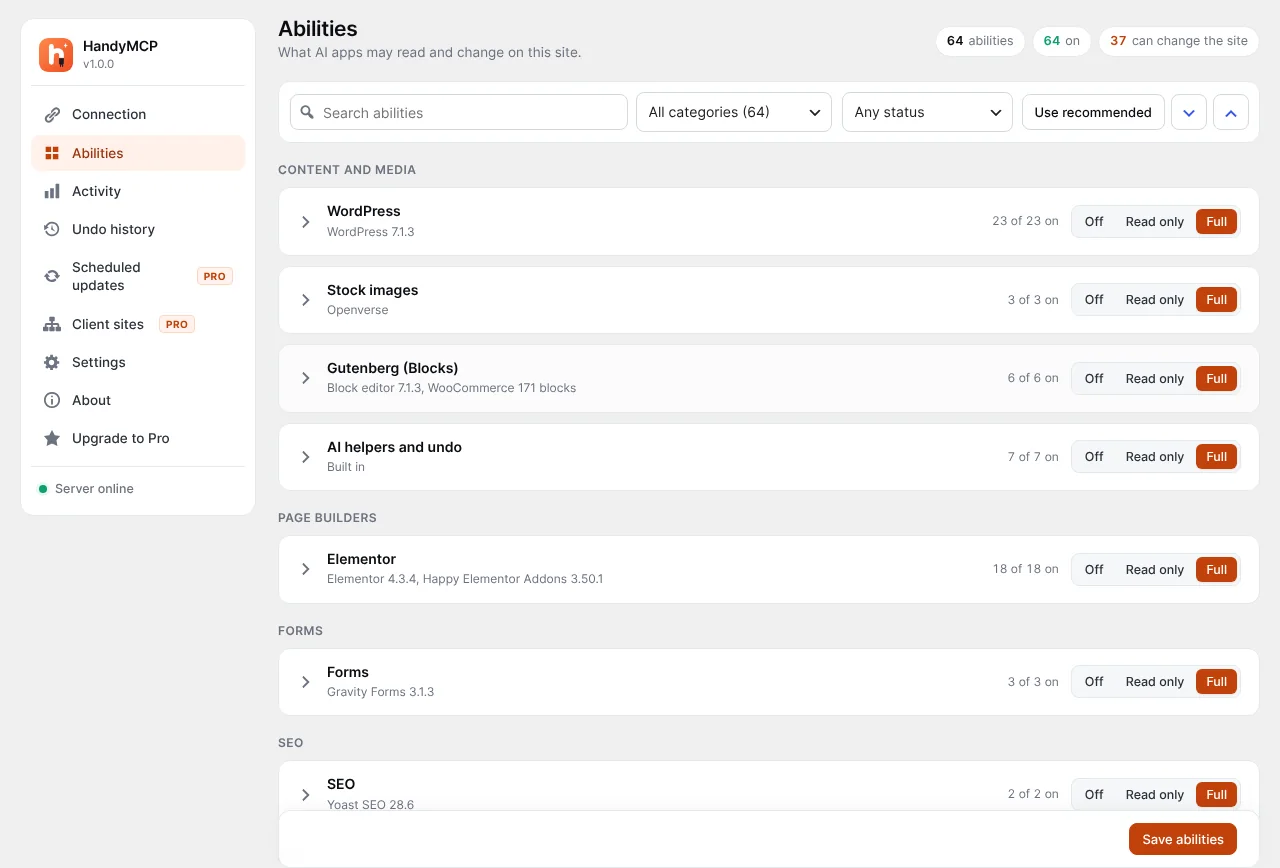
Under HandyMCP > Abilities you can switch off tool groups, turn off single tools or put everything in read only mode. Each token also only works within the WordPress role of the user who made it.
Built in guards
- Destructive tools need explicit confirmation.
- Published pages are only replaced when you clearly ask. “Redesign” or “draft” creates a draft copy.
- A conflict check refuses to overwrite a newer edit.
- There is no tool for raw SQL or arbitrary PHP.
- API keys and payment gateway keys are never returned.
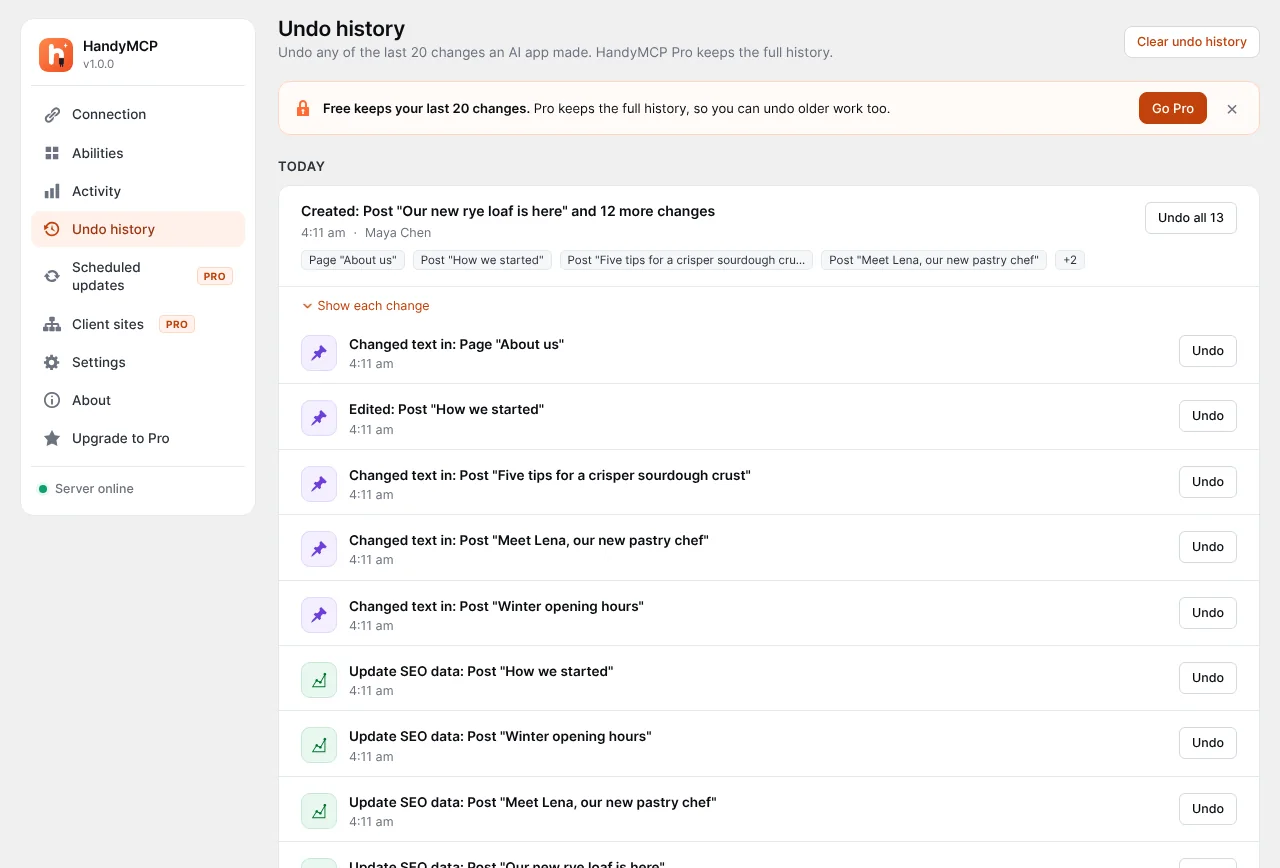
- Every change is saved first and can be undone from Undo history.
Read is it safe to let AI edit a live WordPress site for the full picture, and how to undo AI changes if something goes wrong.
Common mistakes
- Pointing at live when you meant staging. Name servers clearly, like shop-staging and shop-live.
- Missing “Bearer”. The header value must be
Bearer, a space, then the token. - Using the site URL instead of the MCP URL. It must end in
/wp-json/handymcp/v1/mcp. - Not restarting Cursor after editing mcp.json.
- A broad token on a shared machine. Keep scopes tight and revoke tokens you no longer use.
Troubleshooting
Cursor shows the server as offline
Check the URL and HTTPS. Confirm the token has not been paused or revoked. A firewall or security plugin blocking the REST API is a common cause, so allow /wp-json/handymcp/.
Cursor connects but shows no tools
Tool groups may be switched off under Abilities, or the token’s user role may not allow them. Check both.
JSON errors after editing mcp.json
A missing comma or bracket breaks the whole file. Paste it into a JSON validator or let Cursor point out the error.
401 or unauthorised errors
The token is wrong, revoked or missing the Bearer prefix. Create a new token and paste it again.
See the troubleshooting docs and WordPress MCP connection fixes for more.
Alternatives to Cursor
The same server works with other MCP clients. If you prefer the terminal, see connect Claude Code to WordPress. VS Code, Windsurf and Gemini CLI follow a similar pattern, and the connection guide has steps for each.
Frequently asked questions
Does Cursor support MCP servers over HTTP?
Yes. Cursor reads MCP servers from mcp.json, including remote HTTP servers with a URL and headers, and its agent can call their tools.
Can Cursor edit my theme files through MCP?
With HandyMCP Pro, yes. File edits are syntax checked, backed up, tested on the live site and reverted automatically if anything breaks.
Should I use a global or project mcp.json?
Use the global file for your own sites. Use a project file when a codebase is tied to one site, and keep it out of Git.
Can I connect several WordPress sites to Cursor?
Yes. Add one entry per site in mcp.json, each with its own URL and token.
Is the token safe if my laptop is stolen?
Revoke it on the Connection screen and it stops working at once. Tokens are stored hashed on the site, so they cannot be read back from WordPress.
Does HandyMCP cost anything to use with Cursor?
The free version has no usage fees or limits. Pro is a paid plan for extra tools like file editing and updates.
Ready to set it up? Install HandyMCP free and follow the connection guide.